Saturday, October 24, 2015

Colette Patterns - Sorbetto

Colette Patterns website is one of my favorite go-to sources for sewing and fashion inspiration. The layout and graphics are amazing - the photographs and patterns leave me breathless. I long to wear just about every garment they offer.

Incredibly, they also offer several free downloads. This includes the delightful Sorbetto top - a classic silhouette perfect for dress up, casual wear or the office.


Super inspired by their adorable version, I got to work on my own. But regretfully elected not to make the necessary adjustments - if I want clothes that fit....

 
Kris' Sorbetto

Colette Patterns - Sorbetto


Colette's Sorbetto

Vingtage Must-Have Fabric Meets Simplicity 1803

I found THE MOST adorable vintage fabric in a great little shop off Airport Blvd. The only downside was the 36 inch fabric width - instead of 45 or 60 inches.

But I had to have it and knew I could figure out how to make it work.  After a lot of searching pattern catalogs, I found Simplicity 1803. I love what Project Runway has done for patterns and the art of sewing!


If only I could by-pass tissue fitting, I would make most of my clothes. My skills are improving though....
There was not enough fabric for the neck and armhole facings, so I used seam binding instead. The effect was super cute.

Butler Bag

 It's hard to believe so much time has elapsed since my last entry. While sewing has definitely been on the back burner, it has not been completely neglected.

But I craved a simple project without the hassle factor involved in tissue fitting a new garment. I knew when I purchased Amy Butler's Style Stitches - that the Origami Bag Set would be the first thing I tried.
Origami Bag


Using scrap fabric I adored, but was too small for any other project, made me love this bag even more. For the most part, the instructions were easy. It took me about 4 hours from cut out to completion (spread out over 2 days). And having figured them out, the next attempt should be even easier.


Sunday, October 7, 2012

It's A Wrap!


Happy with the success of my blue dress, I really wanted to try my hand at making a wrap version.  Scouring the pattern catalogs I fell in love with Vogue 8784.  I adore the 1960's vintange look of a fitted top and full skirt.  So off to work I went.
Vogue 8784


....imagine my horror cutting out the pieces to find that the front bodice piece looked like some kind of stealth aircraft. How was I going to make adjusting  THAT work?!

But I had already bought my fabric - lovely raw silk from The Common Thread and had my heart set on finishing the project.  So, I did some internet research and Pattern Review had 2 reviewers comments.  The second of  which described her fitting challenges in getting the top/bust area to fit and taking 2 muslin drafts to accomplish the right fit.

At first I threw a fit about how much time and effort this was going to take. And then I thought - just deal with it!  When I think about what I love most about sewing, it is the hum of the machine, the feel of the fabric moving through my hands and the peaceful, satisfaction of working on a project.  So then did it really matter WHAT I was sewing? Nope - so I set to work. 

It took a full Saturday to make all the adjustments and cut out the first muslin.   I included the bodice and down to my hips just to make sure the pattern curves fell correctly.  While the first fit was close enough, I saw wrinkles across the upper back and decided to tweak things a bit more by making a second (because getting the right fit means the difference between regret and wearing).  I'm so glad I did!

The completed project took several weeks to fininsh.  I'm (mostly) happy with the way it turned out.  However, just like cooking and baking - it's important to use the ingredients called for.  And I cheated by using my left over muslin fabric for lining instead of spending the extra money to buy thing. So my dress feels like it weights about 5 pounds!  But hey - I'm still learning.  This was a great challenge in expanding my skills and I learned another valueable lesson in follwing directions. 


Thursday, October 4, 2012

Blue Dress - Fit to Wear!

Feeling quite smug with myself for figuring out my figure issues and sewing a muslin fit to perfection, I was ready to embark on a thousand new projects - one adorable dress at a time.  It also makes me angry that though there are lots of books/instructions on making adjustments, virtually no one who sews tells the rest of us the dirty secret.... almost every body will require at least one or two adjustments to our patterns.  Just accept it upfront as part of the sewing process! If I had understood this truth up front, I could have spent alot more time enjoying AND wearing my projects.

Anyway, having already fallen in love with Simplicity 2444, a Project Runway design I had seen made up at my JoAnn's store. It was also a very close match with one of my favorite ready to wear dresses and made it the perfect pattern to try out my newly acquired fitting skills on.

Pulling out my original muslin, I wrote all of the adjustments now knew I would need to make for every single garment I wanted to sew, and hung up my list on my refrigerator. Though I have a sewing room – working in my kitchen/dining room is my preference!

Locating all the pattern pieces for the view I had in mind, I got started making my adjustments. However, I quickly realized that on the muslin the adjustments had been much simpler because of the straight lines in the McCalls sheath-style pattern I had used. The bodice adjustments I needed to make on my Simplicity pattern pieces fell across several curvier curves. This meant that "folding" out the excess pattern tissue caused the cutting lines to become misshapen due to the increased curvature of the pattern pieces. So what is a not sew girly girl to do? FIGURE it out!

Un-taping my earlier adjustments of 1/2 across the chest, I made two sets of 1/8 inch adjustments to equal 1/2 an inch. I kept them close together but far enough apart so that when folded up, the cutting lines remained relatively unchanged. I knew that I could take the full 1/2 adjustment and re-draw the cutting line, but did not want to take a chance on getting it wrong. Especially since taking several smaller adjustments kept the original lines intact.

I repeated the process for all my bodice pattern pieces, cut them from muslin and made my test run of the bodice only since that was the hardest part to make fit. PERFECTION! Happy with the muslin bodice, I cut all the pieces out of my fashion fabric, a piece of linen I have had for years and sewed it up.

I can't even express how gratifying it was to make this dress and actually wear it! The fit is "custom" and better than some of my ready to wear clothes. JOY, JOY, JOY! And....what to sew next?!


FINALLY Fit!!

Ok...so a long time has gone by since my last blog - but I am ESTATIC to report on a major sewing breakthrough - PATTERN FITTING!


Completely sick of LOVING to sew - WANTING desperately to make my own adorable dresses – doing decent work but not being able to get them to FIT - I thought, this is beyond ridiculous.

I am a reasonably intelligent and more than capable girl. Surely I can figure this out. After having taken a private sewing lesson back in 2010, I learned I was using the wrong size pattern. I needed a size 6 and not the 10 I had been making even though the measurements for a size 10 most closely matched my own.

What I did not know back then was that typically 5 inches of wearing ease is built into most commercial sewing patterns. This doesn't sound like much, but in comparison to read-to wear garments, it’s huge. A loose fitting T-shirt with no side shaping will automatically provide some extra wearing ease as part of the intended look of the garment. Then it is up to the shopper to purchase the individual size she wants according to her shape and comfort level. If a ready to wear garment is designed to be tailored or body contoured, then choosing to purchase a larger size garment for fitting ease distorts the intended fit the designer created the garment for.

In switching to a size 6 I was now sewing the correct circumference, which was good, but it didn't completely resolve my fitting issues. So after a few more sewing misfits followed by some research, I learned that most adult female patterns are for women who measure 5 foot 9. That's much more length than this 5 foot 1 girl needs! And it was time to deal with getting the length problems resolved.

Though I had already been making the "short waist" adjustment pre-printed on most patterns, I now understood that simply removing 1 inch at the waist was not going to adequately address the remaining 7 inch vertical difference between my size and that of the "average" woman. So, what is a not sew girly girl to do? Wait for a pattern sale to buy a sheath style pattern and FIGURE her figure out!

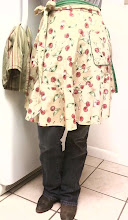
Settling on McCalls 2401 - labeled "easy" and having multiple neck line and sleeve variations, I went to work on my muslin. I decided not to make adjustments of any kind the first time around. After cutting out the tissue pattern pieces I transferred over all the markings particularly the bust apex, waist-line hash mark and added an "x" to mark the fullest curve of the hip.

Trying on my muslin, sans back zipper, I took note of where the garment curves (bust, waist and hips) fell. Knowing in advance that none of them would match mine, I set about pinning "out" the excess fabric on the front of the dress to bring them up where they needed to be.

CAREFULLY taking my pin-filled muslin off, as best I could, I took an ink pen and made marks at the top and bottom of each pinned section. Taking the pins out, I took a ruler and measured each section to determine how much length had been removed from each area. I wrote those numbers directly on the muslin.

Going back to my pattern pieces, with a dress makers ruler, ink pen and removable tape, I made the same length adjustments on the tissue paper that I had written on my muslin. For my purposes, I had to remove 1/2 an inch across my chest at the center front of the arm hole and another 1/4 of an inch under the armhole put the bust curve where my bust falls. Removing a 1/2 inch from the torso area put my pattern waist indent where mine naturally falls. And, new discovery, another 1/2 below the waist about 4-5 inches down brought the pattern hip curve up to meet mine. Once all the “front” pattern pieces were altered, I made the same exact changes to all the “back” pattern pieces.

Next, I re-cut the altered pieces from more muslin, sewed them up and was SHOCKED at how well it fit! Thrilled with my success, rather than make an actual dress from my perfectly altered pieces - I was ready to see if this process worked as well with other patterns. But that is another blog -


Tuesday, November 22, 2011

AAAHHHH Where has my year GONE?!!

OMG - Where on earth has an entire 8 months gone to?!  Or for that matter this entire year?  How is it that the older I get the faster time flies?  So wrong!!

My goal for 2011 was to complete one sewing project per month.  While I knew that was ambitious, my real quest was just to get accustomed to building regular time for sewing into my schedule, knowing that practice yields results!  Yet each time I had a sewing set back - whether a fitting problem or a construction issue; I let the discouragement derail me.  Instead of pressing on...I opted for easier pursuits.

So... just what did I accomplish since planting tomatoes back in March? (which by the way yielded great results in their new location - just before brutal summer heat set in).

1. Started a little black dress - was going so well until I tried it on; only to realize I did not make the "short torso" adjustment I know I have to make.  Sure enough - too tight across my hips without the adjustment.  I did take it apart and may get around to fixing it.  (it would only take a small adjustment to the upper part of the skirt).

2. Started a knitted afghan in a pattern I worked VERY hard to figure out that produces a chevron/wave effect (still in progress).


3. A crocheted baby blanket for a sweet girlfriend. FINISHED! (needed a success under my belt!)

4. Started a new dress in black rayon, decided to self-line my bodice.  This turned out to be a top I couldn't make "turn right-side out"!  So back to the fabric store, and started over with more fabric.  So far I have re-sewn the top but haven't gotten to the point of turning it right side out yet - - I'll get around to it...promise!

In the meantime - it's been dance, dance, dance - Blues, Lindy Hop, West Coast Swing, Foxtrot, Waltz and Two-Step.  Which is where most of my time investments have been directed.  Also started taking Krav Maga back in March which has been a huge confidence booster and provides an awesome workout. 

So, the end result is I have sort of lost my sewing mo-jo, but have really, really enjoyed dancing and learning how to kick butt!  Oh well.... there's always next year right?


1. A fitting issue


2. A knitted chevron

3. A successful crocheted baby blanket!
4. Construction issue...stay tuned